If you are an advanced Windows XP user, you may want to clean up your Start Menu by deleting a help shortcut. This post provides windows xp support to remove The "Help and Support" link on the Windows XP Start menu provides online documentation to Windows and the basic applets such as Notepad, WordPad, etc. It also displays links to online help documents, including those provided by your system manufacturer.
If you are an experienced Windows XP user and do not need this option, you can remove it from the Start Menu.
1. Right-click on an empty area of the taskbar, choosing "Properties".
2. When the "Taskbar and Start Menu Properties" multi-tabbed dialog box appears, select the "Start Menu" tab.
3. Click the "Customize" button.
4. The "Customize Start Menu" multi-tabbed dialog box should appear. Select the "Advanced" tab.
5. Underneath "Start menu items", uncheck "Help and Support".
6. Click "OK" on the dialog boxes to close them.
Showing posts with label Windows XP supoort. Show all posts
Showing posts with label Windows XP supoort. Show all posts

How to Detect and repair disk errors in Windows XP
|
Friday, May 15, 2009
In addition to running Disk Cleanup and Disk Defragmenter to optimize the performance of your computer, you can check the integrity of the files stored on your hard disk by running the Error Checking utility.
As you use your hard drive, it can develop bad sectors. Bad sectors slow down hard disk performance and sometimes make data writing (such as file saving) difficult, or even impossible. The Error Checking utility scans the hard drive for bad sectors, and scans for file system errors to see whether certain files or folders are misplaced. This post provide steps by step tips for computer optimization.
If you use your computer daily, you should run this utility once a week to help prevent data loss.
To run the Error Checking utility:
1.Close all open files.
2.Click Start, and then click My Computer.
3.In the My Computer window, right-click the hard disk you want to search for bad sectors, and then click Properties.
4.In the Properties dialog box, click the Tools tab.
5.Click the Check Now button.
6.In the Check Disk dialog box, select the Scan for and attempt recovery of bad sectors check box, and then click Start.
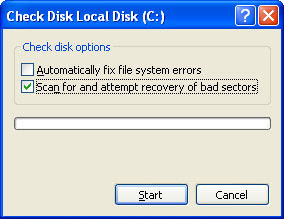
7.If bad sectors are found, choose to fix them.
Tip: Only select the "Automatically fix file system errors" check box if you think that your disk contains bad sectors.
As you use your hard drive, it can develop bad sectors. Bad sectors slow down hard disk performance and sometimes make data writing (such as file saving) difficult, or even impossible. The Error Checking utility scans the hard drive for bad sectors, and scans for file system errors to see whether certain files or folders are misplaced. This post provide steps by step tips for computer optimization.
If you use your computer daily, you should run this utility once a week to help prevent data loss.
To run the Error Checking utility:
1.Close all open files.
2.Click Start, and then click My Computer.
3.In the My Computer window, right-click the hard disk you want to search for bad sectors, and then click Properties.
4.In the Properties dialog box, click the Tools tab.
5.Click the Check Now button.
6.In the Check Disk dialog box, select the Scan for and attempt recovery of bad sectors check box, and then click Start.
7.If bad sectors are found, choose to fix them.
Tip: Only select the "Automatically fix file system errors" check box if you think that your disk contains bad sectors.
Stop 0x0000008E Error In Windows XP
|
Tuesday, April 21, 2009
When you run Windows XP, you may receive a "Stop 0x0000008E" error message on a blue screen. This error message may appear randomly. You may receive this error message during the Windows XP Setup program or after Windows XP is installed.
Possible causes of this error may include the following:
Method 1: Use the Windows Error Reporting tool
You can use the Windows Error Reporting tool to send the error report directly to Microsoft, and the tool reports back if a fix or a workaround is available. To use this tool, follow these steps:
1. When you are prompted to send the error report to Microsoft, click Send Error Report.
2. If a fix or a workaround is available, click More Information to obtain the fix or to obtain information about how to resolve the issue.
Method 2: Remove any hardware or any software drivers that you recently added
Unplug any new external hardware devices, and then try System Restore. Start System Restore as appropriate for your situation.
For more information about steps to take if Windows XP does not start, click the following article number to view the article in the Microsoft Knowledge Base:
How to start the System Restore tool at a command prompt in Windows XP
If Windows XP starts
1. Log on to Windows as Administrator.
2. Click Start, point to All Programs, point to Accessories, point to System Tools, and then click System Restore. System Restore starts.
3. On the Welcome to System Restore page, click Restore my computer to an earlier time if it is not already selected, and then click Next.
4. On the Select a Restore Point page, click the most recent system checkpoint in the On this list, click a restore point list, and then click Next. A System Restore message may appear that lists configuration changes that System Restore will make. Click OK.
5. On the Confirm Restore Point Selection page, click Next. System Restore restores the previous Windows XP configuration, and then restarts the computer.
6. Log on to the computer as Administrator. The System Restore Restoration Complete page appears.
7. Click OK.
Method 3: Run Windows Update, and perform a Microsoft OneCare full service scan
1. To run Windows Update, visit the following Microsoft Web site:
http://windowsupdate.microsoft.com (http://windowsupdate.microsoft.com)
2. To perform a full service scan with Windows Live OneCare, visit the following Microsoft Web site: http://onecare.live.com/site/en-us/default.htm
If the problem is still not resolved, you can use the "Advanced users" section to try to resolve the issue.
Possible causes of this error may include the following:
- Hard disk damage
- General hardware configuration problems with the BIOS, the memory, the hard disk, or with other devices
- Incompatible device driver
- Incompatible software
Method 1: Use the Windows Error Reporting tool
You can use the Windows Error Reporting tool to send the error report directly to Microsoft, and the tool reports back if a fix or a workaround is available. To use this tool, follow these steps:
1. When you are prompted to send the error report to Microsoft, click Send Error Report.
2. If a fix or a workaround is available, click More Information to obtain the fix or to obtain information about how to resolve the issue.
Method 2: Remove any hardware or any software drivers that you recently added
Unplug any new external hardware devices, and then try System Restore. Start System Restore as appropriate for your situation.
- If Windows XP does not start
For more information about steps to take if Windows XP does not start, click the following article number to view the article in the Microsoft Knowledge Base:
How to start the System Restore tool at a command prompt in Windows XP
If Windows XP starts
1. Log on to Windows as Administrator.
2. Click Start, point to All Programs, point to Accessories, point to System Tools, and then click System Restore. System Restore starts.
3. On the Welcome to System Restore page, click Restore my computer to an earlier time if it is not already selected, and then click Next.
4. On the Select a Restore Point page, click the most recent system checkpoint in the On this list, click a restore point list, and then click Next. A System Restore message may appear that lists configuration changes that System Restore will make. Click OK.
5. On the Confirm Restore Point Selection page, click Next. System Restore restores the previous Windows XP configuration, and then restarts the computer.
6. Log on to the computer as Administrator. The System Restore Restoration Complete page appears.
7. Click OK.
Method 3: Run Windows Update, and perform a Microsoft OneCare full service scan
1. To run Windows Update, visit the following Microsoft Web site:
http://windowsupdate.microsoft.com (http://windowsupdate.microsoft.com)
2. To perform a full service scan with Windows Live OneCare, visit the following Microsoft Web site: http://onecare.live.com/site/en-us/default.htm
If the problem is still not resolved, you can use the "Advanced users" section to try to resolve the issue.
How to Manually Uninstall Encarta 2001
|
Monday, April 13, 2009
Some time you are unable to remove any program from computer, and you need to Technical support for Troubleshoot this problems. In this post i am going to to discuss how to remove Encarta 2001 from your computer.
When you attempt to uninstall Encarta 2001 by using the Add/Remove Programs tool in Control Panel, Encarta 2001 may not be completely uninstalled.
If Encarta 2001 is not completely uninstalled, use the following methods to manually delete all of the Encarta folders and registry entries.
NOTE: The Encarta Language Learning programs use many of the same folders and registry entries as Encarta 2001. Therefore, after you complete the methods in this article, you may need to reinstall the Encarta Language Learning programs.
Delete the Encarta Folders
Delete the following Encarta folders:
C:\Program Files\Common Files\Microsoft Shared\Information Retrieval
C:\Program Files\Common Files\Microsoft Shared\Reference 2001
C:\Program Files\Common Files\Microsoft Shared\Reference Titles
C:\Program Files\Microsoft Encarta
C:\Windows\Start Menu\Programs\Microsoft Encarta
All of the Encarta folders that are contained in the following folder:
C:\WINDOWS\Application Data\Microsoft
WARNING: If you use Registry Editor incorrectly, you may cause serious problems that may require you to reinstall your operating system.
Delete the Encarta Registry Entries
Delete the following Encarta registry entries:
HKEY_CURRENT_USER\Software\Microsoft\Microsoft Reference
HKEY_LOCAL_MACHINE\SOFTWARE\Microsoft\Microsoft Reference
HKEY_LOCAL_MACHINE\SOFTWARE\Microsoft\ReferenceTitles
HKEY_USERS\.DEFAULT\Software\Microsoft\Microsoft Reference
Related Topic
Install standard VGA compatible driver
Fix XP Memory Dump File Error
How to add a Windows Firewall exception
computer help
General Computer Health Checkup Tips
When you attempt to uninstall Encarta 2001 by using the Add/Remove Programs tool in Control Panel, Encarta 2001 may not be completely uninstalled.
If Encarta 2001 is not completely uninstalled, use the following methods to manually delete all of the Encarta folders and registry entries.
NOTE: The Encarta Language Learning programs use many of the same folders and registry entries as Encarta 2001. Therefore, after you complete the methods in this article, you may need to reinstall the Encarta Language Learning programs.
Delete the Encarta Folders
Delete the following Encarta folders:
C:\Program Files\Common Files\Microsoft Shared\Information Retrieval
C:\Program Files\Common Files\Microsoft Shared\Reference 2001
C:\Program Files\Common Files\Microsoft Shared\Reference Titles
C:\Program Files\Microsoft Encarta
C:\Windows\Start Menu\Programs\Microsoft Encarta
All of the Encarta folders that are contained in the following folder:
C:\WINDOWS\Application Data\Microsoft
WARNING: If you use Registry Editor incorrectly, you may cause serious problems that may require you to reinstall your operating system.
Delete the Encarta Registry Entries
Delete the following Encarta registry entries:
HKEY_CURRENT_USER\Software\Microsoft\Microsoft Reference
HKEY_LOCAL_MACHINE\SOFTWARE\Microsoft\Microsoft Reference
HKEY_LOCAL_MACHINE\SOFTWARE\Microsoft\ReferenceTitles
HKEY_USERS\.DEFAULT\Software\Microsoft\Microsoft Reference
Related Topic
Install standard VGA compatible driver
Fix XP Memory Dump File Error
How to add a Windows Firewall exception
computer help
General Computer Health Checkup Tips
Fix XP Power Toys are missing!
|
Friday, March 27, 2009
Some Windows XP Power Toys released in a previous version are no longer in the present version. Usually, these were items with which some users reported having problems (though in some cases I’m not aware of any reported problems). While it is prudent to assume that these were pulled from the current set for good cause — due to some problem — it is also true that many computers had no problems with these. This post provide further information and windows operating system support tips for fix Windows XP power toys missing Error.
Before installing new versions of the XP Power Toys, you have to uninstall the old ones. If you already have one or more of the following items installed and you uninstall it, you will not find a replacement version in the current Power Toys release, so you will not be able to reinstall it unless you have the original install files saved somewhere. You have to make your own decision whether or not to continue running these utilities that Microsoft pulled from circulation — I’m just giving you information about the situation (and personally declining to uninstall the withdrawn Background Switcher!).
Background Switcher - (New, December 2001. Withdrawn January 2002.) This one allows your desktop background to periodically change. After you install it, go to Desktop Properties (right-click on an empty part of the desktop) and click on the new Slide Show tab. Select the folder holding the images you want to use, choose whether they should be rotated randomly or sequentially, and pick how often you want them to change.
Faster User Switcher - (Withdrawn April 2002.) “With Fast User Switching enabled on Windows XP, this PowerToy allows you to switch users without having to use the logon screen.” To enable it once it’s installed, see Control Panel | User Accounts | Change the way users log on or off | Use Fast User Switching. You then can use Win+Q to toggle between users. (The Win+L function remains available also and, frankly, I prefer it.) To learn about restrictions to this function, search under “Fast User Switching” in Help & Support.
ISO Image Burner - (New, December 2001. Withdrawn January 2002.) As mentioned above, I’m not the one to ask about this; but a lot of people have been waiting for this one! Burn ISO images to a CD-ROM burner. Since this one has been withdrawn, a very popular recommendation is Alex Feinman’s ISO recorder, available here .
Shell Media Player - (New, December 2001. Withdrawn January 2002.) Play music from the desktop taskbar. After executing the install file, right click your desktop taskbar, click on Toolbars, and click Audio Player. You should see four buttons, one green and three blue. If you do not see these, then you need to resize the Audio Player portion of the taskbar. (You may need to unlock the taskbar to do this: Right-click on it to get this option.) Click the up-pointing button, load your playlist, and you’re off!
Before installing new versions of the XP Power Toys, you have to uninstall the old ones. If you already have one or more of the following items installed and you uninstall it, you will not find a replacement version in the current Power Toys release, so you will not be able to reinstall it unless you have the original install files saved somewhere. You have to make your own decision whether or not to continue running these utilities that Microsoft pulled from circulation — I’m just giving you information about the situation (and personally declining to uninstall the withdrawn Background Switcher!).
Background Switcher - (New, December 2001. Withdrawn January 2002.) This one allows your desktop background to periodically change. After you install it, go to Desktop Properties (right-click on an empty part of the desktop) and click on the new Slide Show tab. Select the folder holding the images you want to use, choose whether they should be rotated randomly or sequentially, and pick how often you want them to change.
Faster User Switcher - (Withdrawn April 2002.) “With Fast User Switching enabled on Windows XP, this PowerToy allows you to switch users without having to use the logon screen.” To enable it once it’s installed, see Control Panel | User Accounts | Change the way users log on or off | Use Fast User Switching. You then can use Win+Q to toggle between users. (The Win+L function remains available also and, frankly, I prefer it.) To learn about restrictions to this function, search under “Fast User Switching” in Help & Support.
ISO Image Burner - (New, December 2001. Withdrawn January 2002.) As mentioned above, I’m not the one to ask about this; but a lot of people have been waiting for this one! Burn ISO images to a CD-ROM burner. Since this one has been withdrawn, a very popular recommendation is Alex Feinman’s ISO recorder, available here .
Shell Media Player - (New, December 2001. Withdrawn January 2002.) Play music from the desktop taskbar. After executing the install file, right click your desktop taskbar, click on Toolbars, and click Audio Player. You should see four buttons, one green and three blue. If you do not see these, then you need to resize the Audio Player portion of the taskbar. (You may need to unlock the taskbar to do this: Right-click on it to get this option.) Click the up-pointing button, load your playlist, and you’re off!
Subscribe to:
Posts (Atom)


