PowerAntivirus2009, is a fake anti-spyware. Like other fake antispyware, Power Antivirus 2009 might launch false system alerts. This Power Antivirus 2009 popup is supposed to scare you into buying Power Antivirus 2009.In this post i am goging to discuss how to manually remove spyware PowerAntivirus 2009.
Follow the steps:
Step 1:- Stop unwanted process running in background.
Click Start then Run and type taskmgr.exe.
Click on Process tab in Task Manager and locate the following Image name(s).
Power Antivirus 2009
Highlight the Image name and Click End Process to stop.
Close the Task Manager.
Step 2:- Uninstall the Suspicious program from the computer.
Click on Start and Run, type appwiz.cpl, press Enter.
Locate Power-Antivirus-2009 in Add and Remove Program.
Click on Remove (Uninstall) button.
Close Add or Remove program.
Restart the computer.
Step 3:- Delete the suspicious file(s) or folder(s) from the computer
Click on Start and Run, type c:\progra~1, press Enter.
Locate the following file(s) and Delete.
Power-Antivirus-2009
Click on Start and Run, type %UserProfile%\Application Data , press Enter.
Locate the following file(s) and Delete
Power-Antivirus-2009
Click on Start and Run, type c:\Documents and Settings\All Users\Start Menu\Programs , press Enter.
Locate the following file(s) and Delete
Power-Antivirus-2009
Close the Window.
Step 4:- Manual Removal of suspicious entries from Registry.
CAUTION: Changing the Registry incorrectly could cause your comuter to stop working. Please make sure to create backup of registry or create system point before proceeding.
Click Start, Click run and type regedit.
Create a registry backup.
Locate the following registry keys, right click and Delete.
HKEY_LOCAL_MACHINE\SOFTWARE\MICROSOFT\WINDOWSNT\CURRENTVERSION\WINDOWS\APPINIT_DLLS\Start Power-Antivirus-2009.ln
HKEY_LOCAL_MACHINE\SOFTWARE\MICROSOFT\WINDOWS NT\CURRENTVERSION\WINLOGON\NOTIFY\Start Power-Antivirus-2009.lnk
HKEY_LOCAL_MACHINE\SOFTWARE\Microsoft\Windows\CurrentVersion\Uninstall\Start Power-Antivirus-2009.lnk
HKEY_LOCAL_MACHINE\Software\Microsoft\Windows\CurrentVersion\Explorer\SharedTaskScheduler\Start Power-Antivirus-2009.lnk
HKEY_LOCAL_MACHINE\Software\Microsoft\Internet Explorer\URLSearchHooks\Start Power-Antivirus-2009.lnk
HKEY_LOCAL_MACHINE\SOFTWARE\MICROSOFT\WINDOWS\CURRENTVERSION\POLICIES\EXPLORER\RUN\Start Power-Antivirus-2009.lnk
HKEY_LOCAL_MACHINE\Software\Microsoft\Internet Explorer\Toolbar\Start Power-Antivirus-2009.lnk
HKEY_LOCAL_MACHINE\Software\Microsoft\Internet Explorer\Explorer Bars\Start Power-Antivirus-2009.lnk
HKEY_LOCAL_MACHINE\Software\Microsoft\Internet Explorer\Extensions\Start Power-Antivirus-2009.lnk
HKEY_LOCAL_MACHINE\SOFTWARE\MICROSOFT\WINDOWS\CURRENTVERSION\RUN\Start Power-Antivirus-2009.lnk
HKEY_LOCAL_MACHINE\SOFTWARE\MICROSOFT\WINDOWS\CURRENTVERSION\RUNONCE\Start Power-Antivirus-2009.lnk
HKEY_LOCAL_MACHINE\SOFTWARE\MICROSOFT\WINDOWS\CURRENTVERSION\RUNONCEEX\Start Power-Antivirus-2009.lnk
HKEY_CURRENT_USER\Software\Microsoft\Windows\CurrentVersion\Explorer\SharedTaskScheduler\Start Power-Antivirus-2009.lnk
HKEY_CURRENT_USER\Software\Microsoft\Internet Explorer\URLSearchHooks\Start Power-Antivirus-2009.lnk
HKEY_CURRENT_USER\SOFTWARE\MICROSOFT\WINDOWS\CURRENTVERSION\POLICIES\EXPLORER\RUN\Start Power-Antivirus-2009.lnk
HKEY_CURRENT_USER\Software\Microsoft\Internet Explorer\Toolbar\Start Power-Antivirus-2009.lnk
HKEY_CURRENT_USER\Software\Microsoft\Internet Explorer\Explorer Bars\Start Power-Antivirus-2009.lnk
HKEY_CURRENT_USER\Software\Microsoft\Internet Explorer\Extensions\Start Power-Antivirus-2009.lnk
HKEY_CURRENT_USER\SOFTWARE\MICROSOFT\WINDOWS\CURRENTVERSION\RUN\Start Power-Antivirus-2009.lnk
HKEY_CURRENT_USER\SOFTWARE\MICROSOFT\WINDOWS\CURRENTVERSION\RUNONCE\Start Power-Antivirus-2009.lnk
HKEY_CURRENT_USER\SOFTWARE\MICROSOFT\WINDOWS\CURRENTVERSION\RUNONCEEX\Start Power-Antivirus-2009.lnk
HKEY_LOCAL_MACHINE\SOFTWARE\MICROSOFT\WINDOWSNT\CURRENTVERSION\WINDOWS\APPINIT_DLLS\Power-Antivirus-2009.lnk
HKEY_LOCAL_MACHINE\SOFTWARE\MICROSOFT\WINDOWS NT\CURRENTVERSION\WINLOGON\NOTIFY\Power-Antivirus-2009.lnk
HKEY_LOCAL_MACHINE\SOFTWARE\Microsoft\Windows\CurrentVersion\Uninstall\Power-Antivirus-2009.lnk
HKEY_LOCAL_MACHINE\Software\Microsoft\Windows\CurrentVersion\Explorer\SharedTaskScheduler\Power-Antivirus-2009.lnk
HKEY_LOCAL_MACHINE\Software\Microsoft\Internet Explorer\URLSearchHooks\Power-Antivirus-2009.lnk
HKEY_LOCAL_MACHINE\SOFTWARE\MICROSOFT\WINDOWS\CURRENTVERSION\POLICIES\EXPLORER\RUN\Power-Antivirus-2009.lnk
HKEY_LOCAL_MACHINE\Software\Microsoft\Internet Explorer\Toolbar\Power-Antivirus-2009.lnk
HKEY_LOCAL_MACHINE\Software\Microsoft\Internet Explorer\Explorer Bars\Power-Antivirus-2009.lnk
HKEY_LOCAL_MACHINE\Software\Microsoft\Internet Explorer\Extensions\Power-Antivirus-2009.lnk
HKEY_LOCAL_MACHINE\SOFTWARE\MICROSOFT\WINDOWS\CURRENTVERSION\RUN\Power-Antivirus-2009.lnk
HKEY_LOCAL_MACHINE\SOFTWARE\MICROSOFT\WINDOWS\CURRENTVERSION\RUNONCE\Power-Antivirus-2009.lnk
HKEY_LOCAL_MACHINE\SOFTWARE\MICROSOFT\WINDOWS\CURRENTVERSION\RUNONCEEX\Power-Antivirus-2009.lnk
HKEY_CURRENT_USER\Software\Microsoft\Windows\CurrentVersion\Explorer\SharedTaskScheduler\Power-Antivirus-2009.lnk
HKEY_CURRENT_USER\Software\Microsoft\Internet Explorer\URLSearchHooks\Power-Antivirus-2009.lnk
HKEY_CURRENT_USER\SOFTWARE\MICROSOFT\WINDOWS\CURRENTVERSION\POLICIES\EXPLORER\RUN\Power-Antivirus-2009.lnk
HKEY_CURRENT_USER\Software\Microsoft\Internet Explorer\Toolbar\Power-Antivirus-2009.lnk
HKEY_CURRENT_USER\Software\Microsoft\Internet Explorer\Explorer Bars\Power-Antivirus-2009.lnk
HKEY_CURRENT_USER\Software\Microsoft\Internet Explorer\Extensions\Power-Antivirus-2009.lnk
HKEY_CURRENT_USER\SOFTWARE\MICROSOFT\WINDOWS\CURRENTVERSION\RUN\Power-Antivirus-2009.lnk
HKEY_CURRENT_USER\SOFTWARE\MICROSOFT\WINDOWS\CURRENTVERSION\RUNONCE\Power-Antivirus-2009.lnk
HKEY_CURRENT_USER\SOFTWARE\MICROSOFT\WINDOWS\CURRENTVERSION\RUNONCEEX\Power-Antivirus-2009.lnk
HKEY_LOCAL_MACHINE\SOFTWARE\MICROSOFT\WINDOWSNT\CURRENTVERSION\WINDOWS\APPINIT_DLLS\Power-Antivirus-2009.exe
HKEY_LOCAL_MACHINE\SOFTWARE\MICROSOFT\WINDOWS NT\CURRENTVERSION\WINLOGON\NOTIFY\Power-Antivirus-2009.exe
HKEY_LOCAL_MACHINE\SOFTWARE\Microsoft\Windows\CurrentVersion\Uninstall\Power-Antivirus-2009.exe
HKEY_LOCAL_MACHINE\Software\Microsoft\Windows\CurrentVersion\Explorer\SharedTaskScheduler\Power-Antivirus-2009.exe
HKEY_LOCAL_MACHINE\Software\Microsoft\Internet Explorer\URLSearchHooks\Power-Antivirus-2009.exe
HKEY_LOCAL_MACHINE\SOFTWARE\MICROSOFT\WINDOWS\CURRENTVERSION\POLICIES\EXPLORER\RUN\Power-Antivirus-2009.exe
HKEY_LOCAL_MACHINE\Software\Microsoft\Internet Explorer\Toolbar\Power-Antivirus-2009.exe
HKEY_LOCAL_MACHINE\Software\Microsoft\Internet Explorer\Explorer Bars\Power-Antivirus-2009.exe
HKEY_LOCAL_MACHINE\Software\Microsoft\Internet Explorer\Extensions\Power-Antivirus-2009.exe
HKEY_LOCAL_MACHINE\SOFTWARE\MICROSOFT\WINDOWS\CURRENTVERSION\RUN\Power-Antivirus-2009.exe
HKEY_LOCAL_MACHINE\SOFTWARE\MICROSOFT\WINDOWS\CURRENTVERSION\RUNONCE\Power-Antivirus-2009.exe
HKEY_LOCAL_MACHINE\SOFTWARE\MICROSOFT\WINDOWS\CURRENTVERSION\RUNONCEEX\Power-Antivirus-2009.exe
HKEY_CURRENT_USER\Software\Microsoft\Windows\CurrentVersion\Explorer\SharedTaskScheduler\Power-Antivirus-2009.exe
HKEY_CURRENT_USER\Software\Microsoft\Internet Explorer\URLSearchHooks\Power-Antivirus-2009.exe
HKEY_CURRENT_USER\SOFTWARE\MICROSOFT\WINDOWS\CURRENTVERSION\POLICIES\EXPLORER\RUN\Power-Antivirus-2009.exe
HKEY_CURRENT_USER\Software\Microsoft\Internet Explorer\Toolbar\Power-Antivirus-2009.exe
HKEY_CURRENT_USER\Software\Microsoft\Internet Explorer\Explorer Bars\Power-Antivirus-2009.exe
HKEY_CURRENT_USER\Software\Microsoft\Internet Explorer\Extensions\Power-Antivirus-2009.exe
HKEY_CURRENT_USER\SOFTWARE\MICROSOFT\WINDOWS\CURRENTVERSION\RUN\Power-Antivirus-2009.exe
HKEY_CURRENT_USER\SOFTWARE\MICROSOFT\WINDOWS\CURRENTVERSION\RUNONCE\Power-Antivirus-2009.exe
HKEY_CURRENT_USER\SOFTWARE\MICROSOFT\WINDOWS\CURRENTVERSION\RUNONCEEX\Power-Antivirus-2009.exe
HKEY_LOCAL_MACHINE\SOFTWARE\MICROSOFT\WINDOWSNT\CURRENTVERSION\WINDOWS\APPINIT_DLLS\Power Antivirus.lnk
HKEY_LOCAL_MACHINE\SOFTWARE\MICROSOFT\WINDOWS NT\CURRENTVERSION\WINLOGON\NOTIFY\Power Antivirus.lnk
HKEY_LOCAL_MACHINE\SOFTWARE\Microsoft\Windows\CurrentVersion\Uninstall\Power Antivirus.lnk
HKEY_LOCAL_MACHINE\Software\Microsoft\Windows\CurrentVersion\Explorer\SharedTaskScheduler\Power Antivirus.lnk
HKEY_LOCAL_MACHINE\Software\Microsoft\Internet Explorer\URLSearchHooks\Power Antivirus.lnk
HKEY_LOCAL_MACHINE\SOFTWARE\MICROSOFT\WINDOWS\CURRENTVERSION\POLICIES\EXPLORER\RUN\Power Antivirus.lnk
HKEY_LOCAL_MACHINE\Software\Microsoft\Internet Explorer\Toolbar\Power Antivirus.lnk
HKEY_LOCAL_MACHINE\Software\Microsoft\Internet Explorer\Explorer Bars\Power Antivirus.lnk
HKEY_LOCAL_MACHINE\Software\Microsoft\Internet Explorer\Extensions\Power Antivirus.lnk
HKEY_LOCAL_MACHINE\SOFTWARE\MICROSOFT\WINDOWS\CURRENTVERSION\RUN\Power Antivirus.lnk
HKEY_LOCAL_MACHINE\SOFTWARE\MICROSOFT\WINDOWS\CURRENTVERSION\RUNONCE\Power Antivirus.lnk
HKEY_LOCAL_MACHINE\SOFTWARE\MICROSOFT\WINDOWS\CURRENTVERSION\RUNONCEEX\Power Antivirus.lnk
HKEY_CURRENT_USER\Software\Microsoft\Windows\CurrentVersion\Explorer\SharedTaskScheduler\Power Antivirus.lnk
HKEY_CURRENT_USER\Software\Microsoft\Internet Explorer\URLSearchHooks\Power Antivirus.lnk
HKEY_CURRENT_USER\SOFTWARE\MICROSOFT\WINDOWS\CURRENTVERSION\POLICIES\EXPLORER\RUN\Power Antivirus.lnk
HKEY_CURRENT_USER\Software\Microsoft\Internet Explorer\Toolbar\Power Antivirus.lnk
HKEY_CURRENT_USER\Software\Microsoft\Internet Explorer\Explorer Bars\Power Antivirus.lnk
HKEY_CURRENT_USER\Software\Microsoft\Internet Explorer\Extensions\Power Antivirus.lnk
HKEY_CURRENT_USER\SOFTWARE\MICROSOFT\WINDOWS\CURRENTVERSION\RUN\Power Antivirus.lnk
HKEY_CURRENT_USER\SOFTWARE\MICROSOFT\WINDOWS\CURRENTVERSION\RUNONCE\Power Antivirus.lnk
HKEY_CURRENT_USER\SOFTWARE\MICROSOFT\WINDOWS\CURRENTVERSION\RUNONCEEX\Power Antivirus.lnk]
Restart the computer.
Fix Invalid System Disk Error
|
Wednesday, March 4, 2009
You may also receive this error message when you start your computer by using a Windows Startup disk, or you may receive the following error message:
This version of Windows does not run on DOS 7.0 or earlier.
This issue can be caused by any of the following conditions:
* Your computer may be infected with a boot-sector virus such as the AntiCMOS.A virus.
* Your computer is running an anti-virus program.
* Your computer is using hard disk management software (such as Disk Manager, EZ-Drive, or DrivePro) for hard disk geometry translation. These tools provide support for large hard disks (more than 1024 cylinders) when your computer's Basic Input/Output System (BIOS) does not support large hard disks.
* Windows Setup was unable to copy the system files to the hard disk.
* Security software has disabled access to drive C.
To fix this issue use one of the following
Computer Is Infected with a Virus
Use an anti-virus program to detect and remove the virus, and then reinstall Windows. Boot-sector viruses infect computers by copying information either to the boot sector on a floppy disk or the partition table on a hard disk. During startup, the virus is loaded into memory. Once in memory, the virus typically infects any non-infected disks that your computer is connected to.
Computer Is Running Anti-Virus Software
Start your computer by using the Windows Startup disk you created during Windows Setup, and then use the sys command from the Windows Startup disk to restore the system files to the hard disk.
Some computers use built-in anti-virus software that must be disabled in the computer's BIOS. For information about how to change settings in the BIOS, view the computer's documentation or contact the manufacturer of your computer.
Computer Is Using Disk Management Software
In some cases, Windows may not properly detect that you are using disk management software and may overwrite the master boot record (MBR) information. Refer to the documentation for the disk management software you are using for information about restoring the MBR.
Also, check the Setuplog.txt file for the following statement:
FSLog: BIOS Heads=:64:, BootPart Heads=:64:
The preceding number (64 in this example) may vary from computer to computer. If these two numbers are different, replace the system files on your hard disk according to the instructions in the following "Reinstall the Windows System Files" section. For additional information about how to determine if your computer is using a drive overlay program
Reinstall the Windows System Files
WARNING: If you are using Disk Manager or any other disk drive overlay program on a hard disk, make sure that the overlay driver is loaded before you use the sys command on that hard disk. If the overlay driver is not loaded and you use the sys command on the hard disk, the drive may not be recognized as being partitioned by the disk drive overlay program and you could experience loss of data or an inability to boot from the drive.
Although you can use the sys command with Ontrack Disk Manager and later versions of MicroHouse EZ-Drive (or EZ-Max) after the overlay driver is loaded, earlier versions such as EZ-Drive 2.01s require that operating system files be copied to the overlay installation disk and installed by the overlay utility. In such cases, the overlay may be damaged if you use the sys command on the hard disk.
1. Start your computer by using the Windows 95 or Windows 98 Startup disk.
2. At the command prompt, type the following commands, pressing ENTER after each command:
c:
cd\windows\command
attrib c:\msdos.sys -s -h -r
copy c:\msdos.sys c:\msdos.xxx
a:
sys c:
attrib c:\msdos.sys -s -h -r
del c:\msdos.sys
copy c:\msdos.xxx c:\msdos.sys
attrib c:\msdos.sys +s +h +r
3. Remove the Windows Startup disk, and then restart the computer.
Security Software Enabled
Some third-party programs prevent (lock) access to hard disks in your computer. If this software is installed, contact the manufacturer about how to remove this software and safely restart Windows 98 Setup. For additional information about Windows Setup and troubleshooting
This version of Windows does not run on DOS 7.0 or earlier.
This issue can be caused by any of the following conditions:
* Your computer may be infected with a boot-sector virus such as the AntiCMOS.A virus.
* Your computer is running an anti-virus program.
* Your computer is using hard disk management software (such as Disk Manager, EZ-Drive, or DrivePro) for hard disk geometry translation. These tools provide support for large hard disks (more than 1024 cylinders) when your computer's Basic Input/Output System (BIOS) does not support large hard disks.
* Windows Setup was unable to copy the system files to the hard disk.
* Security software has disabled access to drive C.
To fix this issue use one of the following
Computer Is Infected with a Virus
Use an anti-virus program to detect and remove the virus, and then reinstall Windows. Boot-sector viruses infect computers by copying information either to the boot sector on a floppy disk or the partition table on a hard disk. During startup, the virus is loaded into memory. Once in memory, the virus typically infects any non-infected disks that your computer is connected to.
Computer Is Running Anti-Virus Software
Start your computer by using the Windows Startup disk you created during Windows Setup, and then use the sys command from the Windows Startup disk to restore the system files to the hard disk.
Some computers use built-in anti-virus software that must be disabled in the computer's BIOS. For information about how to change settings in the BIOS, view the computer's documentation or contact the manufacturer of your computer.
Computer Is Using Disk Management Software
In some cases, Windows may not properly detect that you are using disk management software and may overwrite the master boot record (MBR) information. Refer to the documentation for the disk management software you are using for information about restoring the MBR.
Also, check the Setuplog.txt file for the following statement:
FSLog: BIOS Heads=:64:, BootPart Heads=:64:
The preceding number (64 in this example) may vary from computer to computer. If these two numbers are different, replace the system files on your hard disk according to the instructions in the following "Reinstall the Windows System Files" section. For additional information about how to determine if your computer is using a drive overlay program
Reinstall the Windows System Files
WARNING: If you are using Disk Manager or any other disk drive overlay program on a hard disk, make sure that the overlay driver is loaded before you use the sys command on that hard disk. If the overlay driver is not loaded and you use the sys command on the hard disk, the drive may not be recognized as being partitioned by the disk drive overlay program and you could experience loss of data or an inability to boot from the drive.
Although you can use the sys command with Ontrack Disk Manager and later versions of MicroHouse EZ-Drive (or EZ-Max) after the overlay driver is loaded, earlier versions such as EZ-Drive 2.01s require that operating system files be copied to the overlay installation disk and installed by the overlay utility. In such cases, the overlay may be damaged if you use the sys command on the hard disk.
1. Start your computer by using the Windows 95 or Windows 98 Startup disk.
2. At the command prompt, type the following commands, pressing ENTER after each command:
c:
cd\windows\command
attrib c:\msdos.sys -s -h -r
copy c:\msdos.sys c:\msdos.xxx
a:
sys c:
attrib c:\msdos.sys -s -h -r
del c:\msdos.sys
copy c:\msdos.xxx c:\msdos.sys
attrib c:\msdos.sys +s +h +r
3. Remove the Windows Startup disk, and then restart the computer.
Security Software Enabled
Some third-party programs prevent (lock) access to hard disks in your computer. If this software is installed, contact the manufacturer about how to remove this software and safely restart Windows 98 Setup. For additional information about Windows Setup and troubleshooting
How to recover from a corrupted registry
|
Wednesday, February 25, 2009
How to recover from a corrupted registry that prevents Windows XP from starting.Registry is damaged or corrupt which prevents Windows to boot to desktop. you find a error massage
Windows XP could not start because the following file is missing or corrupt: \WINDOWS\SYSTEM32\CONFIG\SYSTEM
This post describes how to recover a Windows XP system that does not start because of corruption in the registry. This procedure does not guarantee full recovery of the system to a previous state; however, you should be able to recover data when you use this procedure.
Warning Do not use the procedure that is described in this post if your computer has an OEM-installed operating system. The system hive on OEM installations creates passwords and user accounts that did not exist previously. If you use the procedure that is described in this post, you may not be able to log back into the recovery console to restore the original registry hives.
Note Make sure to replace all five of the registry hives. If you only replace a single hive or two, this can cause potential issues because software and hardware may have settings in multiple locations in the registry.
Follow the steps for system which were installed by Windows xp disk.
1.Start the Recovery Console.
2. At the Recovery Console command prompt, type the following lines, pressing ENTER after you type each line:
cd system32\config
ren system system.old
ren software software.old
ren SAM SAM.old
ren security security.old
ren default default.old
cd \
cd windows\repair
copy system C:\windows\system32\config\system
copy software C:\windows\system32\config\software
copy sam C:\windows\system32\config\sam
copy security C:\windows\system32\config\security
copy default C:\windows\system32\config\default
Note The repair directory contains a copy of the registry from the first time the system successfully booted after Windows was installed, or from the last time that the customer performed a full system state backup. Any changes that the customer made to the computer since the repair copy of the registry was created are lost. Also note that this procedure resets your password to the password that was used when you first installed Windows XP or that was used the last time that you backed up System State. If the customer cannot remember this password, you may have to use a more current backup of the registry from the System Restore folder (%systemdrive%\System Volume Information\_restore xxxxx \RP xx\snapshot) instead of from the Repair folder.
Windows XP could not start because the following file is missing or corrupt: \WINDOWS\SYSTEM32\CONFIG\SYSTEM
This post describes how to recover a Windows XP system that does not start because of corruption in the registry. This procedure does not guarantee full recovery of the system to a previous state; however, you should be able to recover data when you use this procedure.
Warning Do not use the procedure that is described in this post if your computer has an OEM-installed operating system. The system hive on OEM installations creates passwords and user accounts that did not exist previously. If you use the procedure that is described in this post, you may not be able to log back into the recovery console to restore the original registry hives.
Note Make sure to replace all five of the registry hives. If you only replace a single hive or two, this can cause potential issues because software and hardware may have settings in multiple locations in the registry.
Follow the steps for system which were installed by Windows xp disk.
1.Start the Recovery Console.
2. At the Recovery Console command prompt, type the following lines, pressing ENTER after you type each line:
cd system32\config
ren system system.old
ren software software.old
ren SAM SAM.old
ren security security.old
ren default default.old
cd \
cd windows\repair
copy system C:\windows\system32\config\system
copy software C:\windows\system32\config\software
copy sam C:\windows\system32\config\sam
copy security C:\windows\system32\config\security
copy default C:\windows\system32\config\default
Note The repair directory contains a copy of the registry from the first time the system successfully booted after Windows was installed, or from the last time that the customer performed a full system state backup. Any changes that the customer made to the computer since the repair copy of the registry was created are lost. Also note that this procedure resets your password to the password that was used when you first installed Windows XP or that was used the last time that you backed up System State. If the customer cannot remember this password, you may have to use a more current backup of the registry from the System Restore folder (%systemdrive%\System Volume Information\_restore xxxxx \RP xx\snapshot) instead of from the Repair folder.
Tips to Avail Good Computer Support Online
|
Thursday, February 19, 2009
Online computer support services have become a fast and reliable problem solution for day to day technical trouble shoot needs. But with so much of service providers available round the corner it is always wise full to evaluate them prior to approaching them for your needs. Here is a list of some of the tips that one should consider.
In today’s world, most of us try to look online when we need to search for anything. Whether it’s about searching business data or information to use in daily lives, Internet has emerged as the most reliable as well as convenient source of search.
If you have ever purchased or owned a desktop/laptop, you will come across a problem at some point. Where you think you can go to avail solutions for all your technical problems? Well! Internet can help. There is a plethora of online technical support resources available to help you with your technical complexities. But what you should always do is contact some form of computer support.
Choose the Computer help and support service resource who you think is professional, quick and helpful. The last thing you want is to get in touch with some form of support to see if it is actually good for your problems or not. You require technicians who hold proficiency and real knowledge about their subject matter.
As such, online computer support resources hire qualified and certified techs. It is one place where you can have both quality and cost effectiveness hand in hand.
Most online computer support companies offer services to both home users and to business users, and customize services to cater what you need according to your preferences. Here is the example of some services that you can expect from different computer support companies:-
Virus and spyware removals: Your PC can have a lot of virus if you are regular Internet users and use the Web without having any protection on your system. You may not even know that you have any threats on your computer until it is too late. Whether a business or a personal computer gets struck down with any of these, the effects can be catastrophic. Good computer support resource will offer you antivirus installation/spyware removal to help you get rid of malware.
Wireless networking issues: Wireless networking is ideal for executing more than one PC from the Internet connection. This makes working from home easier. All of the computers that are on the same wireless network can use the same printers, scanners and any other systems without having to attach them separately.
Other services that are commonly available with online computer support vendors are: Computer Optimization, internet Optimization, setting up home networking, computer repair, fixing printer errors among many others.
In today’s world, most of us try to look online when we need to search for anything. Whether it’s about searching business data or information to use in daily lives, Internet has emerged as the most reliable as well as convenient source of search.
If you have ever purchased or owned a desktop/laptop, you will come across a problem at some point. Where you think you can go to avail solutions for all your technical problems? Well! Internet can help. There is a plethora of online technical support resources available to help you with your technical complexities. But what you should always do is contact some form of computer support.
Choose the Computer help and support service resource who you think is professional, quick and helpful. The last thing you want is to get in touch with some form of support to see if it is actually good for your problems or not. You require technicians who hold proficiency and real knowledge about their subject matter.
As such, online computer support resources hire qualified and certified techs. It is one place where you can have both quality and cost effectiveness hand in hand.
Most online computer support companies offer services to both home users and to business users, and customize services to cater what you need according to your preferences. Here is the example of some services that you can expect from different computer support companies:-
Virus and spyware removals: Your PC can have a lot of virus if you are regular Internet users and use the Web without having any protection on your system. You may not even know that you have any threats on your computer until it is too late. Whether a business or a personal computer gets struck down with any of these, the effects can be catastrophic. Good computer support resource will offer you antivirus installation/spyware removal to help you get rid of malware.
Wireless networking issues: Wireless networking is ideal for executing more than one PC from the Internet connection. This makes working from home easier. All of the computers that are on the same wireless network can use the same printers, scanners and any other systems without having to attach them separately.
Other services that are commonly available with online computer support vendors are: Computer Optimization, internet Optimization, setting up home networking, computer repair, fixing printer errors among many others.
0
comments
Labels:
install antivirus,
pc help,
pc maintenance,
pc repair,
pc repairs,
pc support,
spyware


Steps to take before you install Windows XP SP3
|
Friday, February 13, 2009
Follow the Steps
1. Start computer, and then log on as an administrator.
Note Administrators have complete and unrestricted access to the operating system and to its settings. Use the Administrator user name to log on, or use another account that is a member of the Administrators group. To determine the groups to which you belong, click Start, click Control Panel, and then click User Accounts.
2. If computer is running on battery power, plug it in so that computer does not lose power during the installation.
3. Use Fast User Switching, make sure all other users are logged off.
4. We recommend ,perform a full backup of the files that customer have on your computer to an external location, such as an external hard disk, DVD, CD, USB flash drive, or network folder. You can use the Backup and Restore Wizard to back up documents, pictures, and other files.
5. We recommend to create Restore Point before you begin the installation.
6. Exit all open programs.
7. Install Windows XP SP3.
Related Search:
How to Install Windows Vista
How to Install Windows XP
1. Start computer, and then log on as an administrator.
Note Administrators have complete and unrestricted access to the operating system and to its settings. Use the Administrator user name to log on, or use another account that is a member of the Administrators group. To determine the groups to which you belong, click Start, click Control Panel, and then click User Accounts.
2. If computer is running on battery power, plug it in so that computer does not lose power during the installation.
3. Use Fast User Switching, make sure all other users are logged off.
4. We recommend ,perform a full backup of the files that customer have on your computer to an external location, such as an external hard disk, DVD, CD, USB flash drive, or network folder. You can use the Backup and Restore Wizard to back up documents, pictures, and other files.
5. We recommend to create Restore Point before you begin the installation.
6. Exit all open programs.
7. Install Windows XP SP3.
Related Search:
How to Install Windows Vista
How to Install Windows XP
How to Fix Temporary folder issues
|
Tuesday, February 10, 2009
When your computer does not have sufficient disk space for temporary files, you may notice unpredictable behavior in Access 2003. You must remove the old temporary files on your system periodically. After you remove the old temporary files, make sure that there is at least 8 megabytes (MB) to 10 MB of free space on your disk. Make sure that the free space is available to your temporary (Temp) folder.
You must determine the location of your Temp folder. You must verify the validity of your TMP environment variables and your TEMP environment variables. To do this, follow these steps:
1. Click Start, point to Settings, and then click Control Panel.
2. In Control Panel, double-click System.
3. On the Advanced tab, click Environment Variables.
Check whether the User Variables for list contains valid settings for the TMP environment variable and for the TEMP environment variable.
The following example shows valid settings:
TEMP = C:\TEMP
TMP = C:\TEMP
3. If the TMP environment variable and the TEMP environment variable are not defined, you must create valid environment variables. To do this, follow these steps:
1. In the Environment Variables dialog box, click New under the User variables for section.
2. In the New User Variable dialog box, type TEMP in the Variable Name box.
3. In the Variable Value box, type C:\Temp (or any other valid path and valid folder name).
4. Click OK to add these values to the User Variables for list.
5. Repeat step a through step c to create the TMP environment variable.
4. Click OK.
5. Click OK.
6. Exit Control Panel.
7. Start Microsoft Windows Explorer.
8. Locate the folder that is specified in the TMP environment variable and in the TEMP environment variable.
Note A TEMP environment variable setting that is not valid may have serious effects on Access 2003. Therefore, if you notice that the folder that is specified in the environment variable setting does not exist, you must either open Windows Explorer and then create a new temp folder in the specified location, or you must repeat step 1 through step 3 to update the environment variables to a valid location.
9. Verify that the drive that contains the TEMP folder has sufficient free disk space.
Note Make sure that the free disk space that is available on the drive where the TEMP folder is located is at least two times the size of the largest database that you may potentially open on your computer.
For example, if your largest Access database file is 7 MB, make sure that the drive where the TEMP folder resides has at least 14 MB of free disk space.
10. Verify that the TEMP folder is empty.
If files exist in the TEMP folder, you can delete the .tmp files that are currently not in use. The .tmp files typically have a modified date that is earlier than the current session of Windows.
Note Microsoft recommends that you exit all Windows programs before you delete the .tmp files.
Related Search:
How to Remove Hidden Software
Fix Disk fragmentation or disk errors
PC support services
Dial-up connection with windows Vista
You must determine the location of your Temp folder. You must verify the validity of your TMP environment variables and your TEMP environment variables. To do this, follow these steps:
1. Click Start, point to Settings, and then click Control Panel.
2. In Control Panel, double-click System.
3. On the Advanced tab, click Environment Variables.
Check whether the User Variables for
The following example shows valid settings:
TEMP = C:\TEMP
TMP = C:\TEMP
3. If the TMP environment variable and the TEMP environment variable are not defined, you must create valid environment variables. To do this, follow these steps:
1. In the Environment Variables dialog box, click New under the User variables for
2. In the New User Variable dialog box, type TEMP in the Variable Name box.
3. In the Variable Value box, type C:\Temp (or any other valid path and valid folder name).
4. Click OK to add these values to the User Variables for
5. Repeat step a through step c to create the TMP environment variable.
4. Click OK.
5. Click OK.
6. Exit Control Panel.
7. Start Microsoft Windows Explorer.
8. Locate the folder that is specified in the TMP environment variable and in the TEMP environment variable.
Note A TEMP environment variable setting that is not valid may have serious effects on Access 2003. Therefore, if you notice that the folder that is specified in the environment variable setting does not exist, you must either open Windows Explorer and then create a new temp folder in the specified location, or you must repeat step 1 through step 3 to update the environment variables to a valid location.
9. Verify that the drive that contains the TEMP folder has sufficient free disk space.
Note Make sure that the free disk space that is available on the drive where the TEMP folder is located is at least two times the size of the largest database that you may potentially open on your computer.
For example, if your largest Access database file is 7 MB, make sure that the drive where the TEMP folder resides has at least 14 MB of free disk space.
10. Verify that the TEMP folder is empty.
If files exist in the TEMP folder, you can delete the .tmp files that are currently not in use. The .tmp files typically have a modified date that is earlier than the current session of Windows.
Note Microsoft recommends that you exit all Windows programs before you delete the .tmp files.
Related Search:
How to Remove Hidden Software
Fix Disk fragmentation or disk errors
PC support services
Dial-up connection with windows Vista
How to hack Google Chrome and Run in Windows 7
|
Wednesday, February 4, 2009
Trust Windows how to come up with problems before they can give you a solution to a previous. The other day, I heard that there is a problem for the new Windows 7 beta users. They can not launch Google Chrome. We all know that Google Chrome is one of the fastest but simplest browsers available at this moment. Though it will be unfair to compare it with a veteran and an immensely popular Firefox right now, I am sure that Chrome in the coming years will be a browser alternative to most of us, if not a competitor. So, if you want to start it right away and find Windows 7's restriction a nuisance, then below is the trick.
1. Right Click on Google Chrome Icon on your desktop
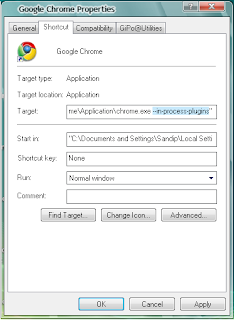
2. Add “–in-process-plugins” (without quotation marks) after chrome.exe in Target field.
Take a look at image below to see what I am talking about:

 3. Click Apply (or OK) to save changes.
4. Now start Google Chrome and Bingo!
So, I hope you can now run Google Chrome without much trouble? Write to me if you want to talk about it further. Happy surfing.
1. Right Click on Google Chrome Icon on your desktop
2. Add “–in-process-plugins” (without quotation marks) after chrome.exe in Target field.
Take a look at image below to see what I am talking about:

 3. Click Apply (or OK) to save changes.
4. Now start Google Chrome and Bingo!
So, I hope you can now run Google Chrome without much trouble? Write to me if you want to talk about it further. Happy surfing.
Subscribe to:
Posts (Atom)


